Showing posts with label menu. Show all posts

Thursday, July 24, 2014

Fluffy Omelet

Fluffy Omelet

[From America's Test Kitchen, Episode 1403: Three Ways With Eggs]

Serves 2

A teaspoon of white vinegar or lemon juice can be used in place of the cream of tartar, and a hand-held mixer or a whisk can be used in place of a stand mixer. We recommend using the fillings that accompany this recipe; they are designed not to interfere with the cooking of the omelet.

  • 4 large eggs, separated
  • 1 tablespoon unsalted butter, melted, plus
  • 1 tablespoon unsalted butter
  • ¼ teaspoon salt
  • ¼ teaspoon cream of tartar
  • 1 recipe filling (recipes follow)
  • 1 ounce Parmesan cheese, grated (½ cup)


1. Adjust oven rack to middle position and heat oven to 375 degrees.
Whisk egg yolks, melted butter, and salt together in bowl.
Place egg whites in bowl of stand mixer and sprinkle cream of tartar over surface.
Fit stand mixer with whisk and whip egg whites on medium-low speed until foamy, 2 to 2½ minutes.
Increase speed to medium-high and whip until stiff peaks just start to form, 2 to 3 minutes.
Fold egg yolk mixture into egg whites until no white streaks remain.

2. Heat remaining 1 tablespoon butter in 12-inch ovensafe nonstick skillet over medium-high heat, swirling to coat bottom of pan.
When butter foams, quickly add egg mixture, spreading into even layer with spatula.
Remove pan from heat and gently sprinkle filling and Parmesan evenly over top of omelet.
Transfer to oven and cook until center of omelet springs back when lightly pressed, 4½ minutes for slightly wet omelet and 5 minutes for dry omelet.

3. Run spatula around edges of omelet to loosen, shaking gently to release.
Slide omelet onto cutting board and let stand for 30 seconds.
Using spatula, fold omelet in half. Cut omelet in half crosswise and serve immediately.


ASPARAGUS AND SMOKED SALMON FILLING

MAKES ¾ CUP

Heat 1 teaspoon olive oil in 12-inch nonstick skillet over medium-high heat until shimmering. Add 1 shallot, sliced thin, and cook until softened and starting to brown, about 2 minutes. Add 5 ounces asparagus, trimmed and cut on bias into ¼-inch lengths, pinch salt, and pepper to taste, and cook, stirring frequently, until crisp-tender, 5 to 7 minutes. Transfer asparagus mixture to bowl and stir in smoked 1 ounce smoked salmon, chopped, and ½ teaspoon lemon juice.

MUSHROOM FILLING

MAKES ¾ CUP

Heat 1 teaspoon olive oil in 12-inch nonstick skillet over medium-high heat until shimmering. Add 1 shallot, sliced thin, and cook until softened and starting to brown, about 2 minutes. Add 4 ounces white or cremini mushrooms and ⅛ teaspoon salt and season with pepper to taste. Cook until liquid has evaporated and mushrooms begin to brown, 6 to 8 minutes. Transfer mixture to bowl and stir in 1 teaspoon balsamic vinegar.

Sunday, November 4, 2012

Fresh Corn Salsa

Recipe based on the one found on page 22 of the Cook's Illustrated magazine #117, 2012.  Uses fresh (on the cob) corn and avocados.


  • 3 ears of corn, kernals cut from cob result in about 2-1/4 cups
  • 1/4 teaspoon baking soda
  • Salt and fresh ground pepper to taste
  • 2 tablesposoons lime juice
  • 2 tablespoon olive oil
  • 1/2 teaspoon honey
  • 1/2 teaspoon cumin seeds
  • 1/8 teaspoon cayenne pepper
  • 2 avocados cut unto 1/4 inch cubes
  • 3 scallions, chopped
  • 1 jalapeño chile, stem and seeds removed, minced
  • 1/4 cup cilantro, fresh chopped

  1. Remove corn from the cob while bringing 2 cups of water to a boil. Stir in corn kernals, baking soda, and 1/4 teaspoon salt. Remove from heat and set aside to steep for 10 minutes.
  2. Drain corn and let cool (for at least 11 more minutes).
  3. Whisk the lime juice, oil, honey, and 1/2 teaspoon salt together in a bowl. 
  4. Toast cumin seeds in a dry skillet. Add cumin and cayenne to liquid in the bowl and whisk.
  5. Add corn, avocados, shallots, jalapeño, and cilantro to the lime juice mixture and toss.
  6. Let sand for 12 minutes or more before serving. Salt and pepper to taste.
If you have some tasty fresh tomatoes dice a couple of them and add for color. I also tend to add a couple of shakes of hot sauce if I'm not serving it to other people.

Serve with grilled stuff or simply eat using tortilla chips as a spoon.

Sunday, December 4, 2011

Brownies

chewy brownies Learned this recipe from ATK, Season 11 Chewy Brownies. First made it for Sharon to take to Lark Camp 2011 to hand out (I wanted to have a couple of brownies but didn't want to have eaten the whole thing.) They were a big hit so I'm making them again to hand out as Christmas gifts to friends and coworkers.

Chewy Brownies Yield: 24 brownies (4 - 6 servings)

Calories: 254 per square

1/3 cup Dutch-processed cocoa

1½ teaspoons instant espresso (optional)

½ cup plus 2 Tablespoons boiling water

2 ounces unsweetened chocolate, finely chopped

4 tablespoons (½ stick) unsalted butter, melted

½ cup plus 2 Tablespoons vegetable oil

2 large eggs

2 large egg yolks

2 teaspoons vanilla extract

2½ cups (17½ ounces) sugar

1¾ cups (8¾ ounces) all-purpose flour

¾ teaspoon salt

6 ounces bittersweet chocolate, cut into ½-inch pieces

  1. Adjust oven rack to lowest position and heat oven to 350°F. Line a 9×13-inch baking pan with foil, leaving about a one-inch overhang on all sides. Spray with nonstick cooking spray.
  2. Whisk cocoa, espresso powder, and boiling water together in large bowl until smooth. Add unsweetened chocolate and whisk until chocolate is melted. Whisk in melted butter and oil. (Mixture may look curdled.) Add eggs, yolks, and vanilla and continue to whisk until smooth and homogeneous. Whisk in sugar until fully incorporated. Add flour and salt and mix with rubber spatula until combined. Fold in bittersweet chocolate pieces.
  3. Scrape batter into prepared pan and bake until toothpick inserted halfway between edge and center comes out with just a few moist crumbs attached, 30 to 35 minutes. Transfer pan to wire rack and cool 1½ hours.
  4. Using foil overhang, lift brownies from pan. Return brownies to wire rack and let cool completely, about 1 hour. Cut into 2-inch squares and serve. Brownies can be stored in an airtight container at room temperature for up to 4 days (if well hidden.)

(From Cook’s Illustrated, March & April 2010 issue)


Here is another posting for the same Cook's Illustrated chewy brownies recipe, looks like a great blog for finding cooking inspiration.

Saturday, November 5, 2011

Upma

Two years ago I blogged about the Loughhaven restaurant. Well here is information on upma/uppammaa/upama (a spicy Indian dish using curry, vegetables and Cream of Wheat). Cream of Wheat, semolina and sooji; the names are many but the truth is one. Upma is good, make it the way you like it.

We tried toasting the sooji in a dry dutch oven and set it aside. Later used only two cups of water for a fluffier constancy. Sharon thought the wheat was a bit under cooked so next time we will use 2 ½ cups of water to a cup of sooji.

Below are a couple of videos that I referenced in developing the above recipe.

We tried the mold trick in this next video without using Pam, the upma came right out, no problem. (Maybe a non-fluffy version of the dish (more water) will cause it to stick to the cup.) Molding it certainly makes for a nice presentation, I put the yogurt on top and the pickle on the side.

If you know what you are doing this video is nice. She uses 3 cups of water to 1 cup of sooji.

Saturday, July 9, 2011

No-Fuss Creamy Polenta

This was the first of my recipes to test from season 11 of America's Test Kitchen.

We served the No-Fuss Creamy Polenta with Pan-Seared Scallops.

Serves 4 as a main course with a topping or 6 to 8 as a side dish.

We used the recommended brand of coarse-ground degerminated cornmeal, Bob's Red Mill Corn Grits a.k.a. Polenta. ATK recommends the avoidance of instant and quick-cooking products as well as whole-grain, stone-ground and regular cornmeal.

While cooking the polenta should do little more than release wisps of steam, especially after the first 10 minutes. If your stove at its lowest setting is to hot use a flame tamer or heat defuser to reduce the BTUs transferred to the pot.

  • 7 1/2 cups water
  • 1 1/2 teaspoons table salt
  • 1 pinch baking soda (most important/secret ingredient)
  • 1 1/2 cup coarse-ground cornmeal (5:1 water to cornmeal)
  • 4+ oz Parmesan cheese, grated (about 2 cups), reserve some for serving
  • 2 tablespoons unsalted butter
  • ground black pepper
  1. Bring the water to a boil in a heavy-bottomed 4 quart saucepan over medium-high heat. Stir in salt and baking soda.
  2. Slowly pour the cornmeal into the water in a steady stream while stirring back and forth with a wooden spoon.
  3. Continue constant stirring until it comes to a boil, about 1 minute.
  4. Reduce to the lowest setting. (See note above.)
  5. After 5 minutes, scrape the sides/bottom of the pan while whisking the polenta to smooth out the lumps, about 15 seconds.
  6. Cover and continue to cook for about 25 minutes, steam should be coming out is wisps, not bubbling. It is done when the polenta is loose and barely holds it shape, slightly al dente.
  7. Remove for heat and stir in most of the Parmesan and butter. Season with pepper to taste.
  8. Cover (off heat) rest for 5 minutes. Serve with the remaining Parmesan to garnish on the plate.


See also the video segment that includes information about buying scallops and how to determine is you have wet or dry scallops. Or watch the entire episode 1105 video. Note: these video are available while the TV show is begin aired but are moved into the "members only" content section of the website a year or so later.

Sunday, April 10, 2011

Roasted Glazed Beer Can Chicken

This recipe if from Season 10 of American's Test Kitchen (ATK). I used a 24oz can of beer so the 6 pound chicken set all the way up and didn't have to squat on the roasting pan.
Do not brine the bird this time; it will prevent the skin from becoming crisp before the chicken is burned to a crisp. The glaze recipe is not included, there are so many you need to find your own.
Serves 2 to 3. Time 4 hours (20 min prep, <= 1 hour air dry, 2+ hours cook, 20 min rest/serve).
1whole chicken (6 to 7 pounds), giblets removed and discarded
1 1/2teaspoons table salt (I used a "smoked" salt from the farmers market.)
1teaspoon baking powder
1teaspoon ground tellicherry black pepper
  1. Place chicken breast-side down on work surface. Use tip of sharp knife to make four 1-inch incisions along back of chicken. Using fingers carefully separate skin from thighs and breast. Using metal skewer, poke 15 to 20 holes in fat deposits on top of breast halves and thighs. Tuck wing tips underneath chicken.
  2. Pat chicken dry with paper towels. Combine salt, baking powder, and pepper in small bowl. Sprinkle all over with salt mixture. Rub in mixture with hands, coating entire surface evenly. Set chicken in the vertical position on rimmed baking sheet and refrigerate, uncovered, for as much as an hour. If you need to lay the bird down is should be breast-side up, in V-rack (air needs to circulate over all the skin.)
  3. Adjust oven rack to lowest position and heat oven to 325°F. The 16 or 24 oz beer can needs to be half full of liquid (beer is classic but water is fine as well.) Spay the can with vegetable oil spray for ease of extraction and set the bird down, feet first, over the can in the middle of your roasting pan. Roast chicken 75 to 90 minutes until instant-read thermometer inserted in thickest part of breast registers 140°F and the skin starts to golden.
  4. Remove the chicken from the oven. Increase oven temperature to 500°F. Make a glaze while it heats. I like the ginger soy sauce glaze but a nice BBQ sauce from the store would work for a quick meal.
  5. Put 1 1/2 cups of water in the bottom of the pan to prevent burning (and for the gravy.) Continue to roast until skin is golden brown, crisp, and instant-read thermometer inserted in thickest part of breast registers 160° and 175°F in thickest part of thigh, 24 to 30 minutes.
  6. Take the bird out of the over and paint with the glaze. Put back in 500° oven for 5 minutes to set the glaze. [Yes the meat if fully cooked but five more minutes to adhere the glaze would hurt anything.]
  7. Transfer chicken to cutting board and brush on a second coat of glaze. Let chicken rest on the can, uncovered, for 20 minutes.
  8. In sauce pan whisk 1/2 cup of the strained chicken juice (separate the fat from the juice) and 1/4 cup of glaze with the dripping from the cutting board. Simmer for 5 minutes.
  9. Carefully lift the chicken off the can (it takes four hands, the beer is still burning hot) and lay on cutting board. Carve and serve with the pan sauce.
I made the roasted broccoli from the same episode as well. I added a couple of carrots cut in half, pole to pole, sweet. These two go well together because they both use a 500° F oven. Served with a fresh beget. Well have ice cream later.


Friday, December 31, 2010

Ultra-Creamy Mashed Potatoes

This recipe for mashed potatoes is to die for. Really, if you eat them every day you'd have heart failure from all the butter fat. But of the special meal where rich wonderful food is required this is what you want. Note that Yukon Gold potatoes are use because they have a low starch content (its part of the ultra-creamy secret.)
  • 4 pounds of Yukon Gold potatoes
  • 12 tablespoons unsalted butter, cut into 2 tablespoon pieces (1 1/2 sticks)
  • 1 1/2 cups heavy cream
  • table salt
  1. Skin the potatoes. Usually I leave the skins on for both smash and mashed potatoes but this time remove the peal (its part of the ultra-creamy secret.)
  2. Cut potatoes into 1/2 inch slices to facilitate quick even cooking. Place in a colander and rinse under cold running water of a minute turning with hands (removing starch is part of the ultra-creamy secret.)
  3. Place the rinsed potatoes into a dutch oven and cover with 1 inch of water. Add a tablespoon of table salt. Bring to a boil and then turn down heat but continue the boiling until done, fork tender (25 - 20 minutes.)
  4. While potatoes are cooking, melt the butter into the cream in a sauce pan over medium heat, about 5 minutes. Once melted keep it warm but don't keep cooking it. (This is the creamy part of the ultra-creamy secret.)
  5. Potatoes cooked, drain in a colander then put the potatoes back into the dutch oven on the stove. Cook on low for a couple of minutes to evaporate all the remaining water (removing water is part of the ultra-creamy secret.)
  6. Run the dried potatoes through a food mill (or potato ricer). This breaks down the potato without whipping in air or releasing starch (part of the ultra-creamy secret.)
  7. Gently fold in the cream mixture and salt with a spatula until the liquid is fully incorporated into the potatoes. (Gentle is part of the ultra-creamy secret.)
  8. Serve with a spoon (no butter, no gravy, no cheese, no leftovers.)
This recipe came from the folks at ATK.

Sunday, September 19, 2010

Ouzo Substitutions

I needed ouzo for the Greek-Style Shrimp and Feta recipe so I used a vodka tincture substitute. (From the Cooks Illustrated magazine for September & October 2010, page 13.)

Ouzo, the popular anise-flavored spirit of Greece, lends shrimp saganaki a nuanced flavor that we like. But since ouzo is not in everyone's liquor cabinet, here are two alternative.

Pernod—Though slightly sweeter than ouzo, this French asise-flavored liqueur is the next best thing.

Vodka + Anise Seed—One tablespoon of vodka plus 1/8 teaspoon of anise seed makes a fine substitute for 1 tablespoon of ouzo.

I used the vodka method. We have star anise so I broke the seeds out and crushed them with a mortar and pestle before mixing with the vodka to form the tincture.

Note the Greek-Shrimp recipe calls for 3 tablespoons of ouzo so triple the above formula.

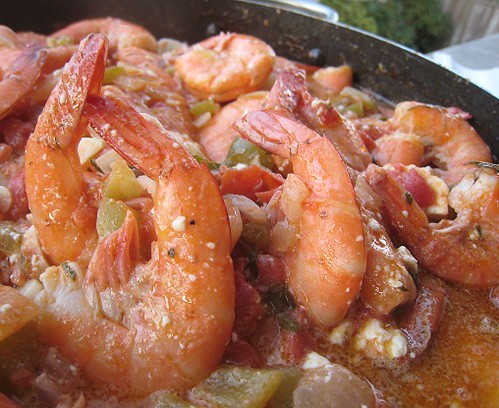
Greek Shrimp with Feta

This easy weeknight Greek dish defies the old saw that seafood and cheese don't work together—if, that is, you get every element just right. From the Cooks Illustrated magazine for September & October 2010.

I made this recipe when I first got this month's Cooks Illustrated magazine and we really really liked it. They wanted to simplify and improve on the classic Greek dish, shrimp saganaki. Since I didn't have ouzo I did the vodka anise substitute and it worked (remember, I do NOT like licorice so I was pleasantly surprised that it complimented the dish and didn't ruin it.) I didn't know we had fresh parsley & dill in the garden so I substituted fresh basil. ATK recommends feta made with sheep or goat milk but Safeway only had American cows milk varieties.

The next week I made it but skipped the ouzo marinade and used Paul Newman's Own pasta sauce for a quick low hassle version. It was good food but not the spectacular complex flavor of the Cooks Illustrated recipe. What follows it mostly from the magazine, page 13.

Greek-Style Shrimp with Tomatoes and Feta Serves 6 with crusty bread, steamed white rice or my favorite egg noodles.

301 calories per serving of shrimp, 221 calories per cup of egg noodles.

  • 1 1/2 pounds shrimp (thawed, peeled and deveined)
  • 4 tablespoon extra-virgin olive oil
  • 3 tablespoons ouzo
  • 5 medium garlic cloves (minces or pressed, about 5 teaspoons)
  • 1 teaspoon grated zest from 1 lemon
  • Table salt and fresh ground black pepper
  • 1 small onion, diced medium (about 1/2 cup)
  • 1/2 medium green bell pepper, stemmed, seeded and diced medium (about 1/2 cup)
  • 1/2 medium red bell pepper, stemmed, seeded and diced medium (about 1/2 cup)
  • 1/2 teaspoon red pepper flakes
  • 28 oz Hunt's diced tomatoes drained, 1/3 cup juices reserved
  • 1/4 cup dry white wine
  • 2 tablespoons coarsely chopped fresh parsley leaves
  • 6 ounces feta cheese, crumbled (about 1 1/2 cups)
  • 2 tablespoons chopped fresh dill
  1. Toss shrimp, 1 tablespoon oil, tablespoon ouzo, 1 teaspoon garlic, lemon zest, 1/4 teaspoon salt, and 1/8 teaspoon black pepper in a small bowl until well combined. Set aside while preparing sauce.
  2. Heat 2 tablespoons oil in 12-inch skillet over medium heat until shimmering. Add onion, red and green bell pepper, and 1/4 teaspoon salt and stir to combine. Cover skillet and cook, stirring occasionally, until vegetables release their moisture, 3 to 5 minutes. Uncover and continue to cook, stirring occasionally, until moisture cooks off and vegetables have softened, about 5 minutes longer.
  3. Add remaining 4 teaspoons garlic and red pepper flakes and cook until fragrant, about 1 minute. Add tomatoes and reserved juice, wine and remaining 2 tablespoons ouzo, increase heat to medium-high and bring to simmer.
  4. Reduce heat to medium and simmer, stirring occasionally, until flavors have melded and sauce is slightly thickened (sauce should not be completely dry), 5 to 8 minutes.
  5. Stir in parsley and season to taste with salt and black pepper.
  6. Reduce heat to medium-low and add shrimp along with any accumulated liquid to pan; stir to coat and distribute evenly. [Also branch to step 8, start cooking pasta.] Cover and cook, stirring occasionally, until shrimp are opaque throughout, 6 to 9 minutes for extra-large shrimp (21 to 25 count) or 7 to 11 minutes for jumbo (16 to 20 count), adjusting heat as needed to maintain bare simmer.
  7. Remove pan from heat and sprinkle evenly with feta. Drizzle remaining tablespoon oil evenly over top and sprinkle with dill.
  8. Serve immediately over extra wide egg noodles made with Durum wheat, 12 oz package. Dump the pasta into the boiling salt water about the time the shrimp are added to the dish (step 6).

Here is a video I found in researching this recipe. I learned a few things (you can light the ouzo on fire the way he does it.) But I think the Cooks Illustrated recipe looks better.

Friday, July 30, 2010

Pulled Pork Informaiton

I've been making pulled pork since fall of 2007. Trevor turned me on to it as a home BBQ staple. Here is some information from the July 2010 West Texas Bar-B-Que email newsletter (article re-posted below). We enjoy the West Texas food and I believe the BBQ tips are sound.


Ask Mr. BBQ

Question: I'm a beginning smoker. What would be my easiest cut of meat to start with? -John K. , Sacramento

Answer: Hey John! Pulled pork is a great way to start smoke cooking. It's one the tastiest too!

You'll want to use a Boston butt (aka: pork butt, butt, shoulder butt, shoulder roast). Even thought it's called a butt, it actually comes from the front of the hog. I read on the internet that it's called a butt because, after it's trimmed, the butt is barrel shaped, and barrels were often called butts by English wine merchants. I'm sure there are many other stories or thoughts on that.

Anyway, butts come in a lot of different sizes, but you should start with about a 5 pounder. They typically have shoulder blade bones in them although you can find "boneless butts" in some stores. Just go with the bone-in as it seems to add more flavor to the butt.

Pulled Pork Recipe

Cooking time. Allow 7 to 12 hours or 1.5 to 2 hours per pound at 225°F.

Ingredients:

  • 1 pork butt, about 5 pounds (this will get you about 3 ½ pounds of meat when done)
  • 1/4 cup vegetable oil
  • 1/2 cup Texas West BBQ Rub
  • 2 cups wood for smoke (enough to keep your temp steady)
  • 10 buns
  • Lot's of Texas West BBQ barbecue sauce (original or Secret Spicy)
  • Beer (for drinking while your smoking your pork butt)
Directions:

Trim some of the fat from the exterior of the meat but not all of it. Trim just enough to where you've got rub on meat and fat. If you're butt came tied with string to keep it together, be sure to leave it on there, you'll take it off when it's done.

Rinse and pat dry the butt then rub it with Oil. This helps the rub adhere to the meat. Cover your butt generously with Texas West BBQ rub and then let it sit in the fridge overnight.

Set up your cooker for indirect heat cooking and fire it up the cooker to about 225°F. Put the meat right on the grill grate, not in a pan, add 1/2 cup of wood chips to the coals or into your smoker box if you're using one. Get a comfortable lounge chair and relax with a good beer while you listen to the ball game. Check the cooker every hour or so to make sure you're holding at around 225°F. Keep adding wood chips, 1/4 cup at a time, every 30 minutes for the first two hours to keep the temp right. No need to mop the meat, it's not necessary for the pork butt and can cause havoc when trying to keep your temperature steady.

Allow about 1.5 to 2 hours per pound. Be patient. Use a meat thermometer and test it when you're about 7 hours in for a 5 pound butt. When the meat gets to 190°F, it's time to check it for doneness. The exterior will be quite dark brown or black, that's called the crust and it's really good! Don't worry, it's not burnt. If there is a bone, use a glove or paper towel to protect your fingers and wiggle the bone. If the bone turns easily and comes right out of the meat, you are done. If the internal temp hits 190°F but the meat is still not tender, reduce the heat in your cooker to about 180 or 190°F and check it in another 30 minutes.

After you take it off the cooker, let it rest for about 30 minutes then get to pullin'! It will go a lot faster if you get some help with this part! That's it! Pile it on a bun and top with some Texas West BBQ sauce. Enjoy!

Monday, February 1, 2010

Cherry Tomato Salad

American's Test Kitchen (ATK) Season 9 included a cherry tomato salad, I tried it and loved it. Here is their recipe (directions) but the herbs and cheeses are my formula (taken from the ATK website recipes).

If in-season cherry tomatoes are unavailable, substitute vine-ripened cherry tomatoes or grape tomatoes from the supermarket. Cut grape tomatoes in half along the equator (rather than quartering them). If you don’t have a salad spinner, after the salted tomatoes have stood for 30 minutes, wrap the bowl tightly with plastic wrap and gently shake to remove seeds and excess liquid. Strain the liquid and proceed with the recipe as directed. The amount of liquid given off by the tomatoes will depend on their ripeness. If you have less than 1/2 cup of juice after spinning, proceed with the recipe using the entire amount of juice and reduce it to 3 tablespoons as directed (the cooking time will be shorter).

Cheese: use one or more of the following, proportionally reduce amount when multiple cheeses are included.

  • 4 ounces feta cheese , crumbled (about 1 cup)
  • 2 ounces crumbled blue cheese
  • 8 ounces fresh mozzarella cheese , cut into 1/2-inch cubes and patted dry with paper towels
Herbs: use one or more of the following, proportionally reduce the amount when multiple herbs are included.
  • 1 1/2 tablespoons chopped fresh tarragon leaves
  • 3 tablespoons chopped fresh parsley leaves
  • 1 1/2 cups lightly packed fresh basil leaves, roughly torn
Serves 4 to 6
2 pints cherry or grape tomatoes , ripe, cut up (about 4 cups) (see note above)
Table salt to taste
1/2 teaspoon sugar
2 medium garlic cloves , minced or pressed through garlic press (about 2 teaspoons)
1/2 teaspoon dried oregano
1 medium shallot , minced (about 3 tablespoons)
1 tablespoon red wine or balsamic vinegar
2 tablespoons extra-virgin olive oil
Fresh ground black pepper
1 small cucumber , peeled, seeded, and cut into 1/2-inch dice (score skin longitudinally with a fork before slicing)
1/2 cup chopped pitted kalamata olives (optional)
1/2 cup coarsely chopped pecans , toasted (optional)
1 hunk of cheese, crumbled/diced (see note above)
1 bunch chopped fresh herbs (see note above)

1. Toss tomatoes, 1/4 teaspoon salt, and sugar in medium bowl; let stand for 30 minutes. Transfer tomatoes to salad spinner and spin until seeds and excess liquid have been removed, 45 to 60 seconds, stirring to redistribute tomatoes several times during spinning. Return tomatoes to bowl and set aside. Strain tomato liquid through fine-mesh strainer into liquid measuring cup, pressing on solids to extract as much liquid as possible.

2. Bring 1/2 cup tomato liquid (discard any extra), garlic, oregano, shallot, and vinegar to simmer in small saucepan over medium heat. Simmer until reduced to 3 tablespoons, 6 to 8 minutes. Transfer mixture to small bowl and cool to room temperature, about 5 minutes. Whisk in oil and pepper to taste until combined. Taste and season with up to 1/8 teaspoon table salt.

3. Add cucumber, olives, cheese, dressing, and herbs to bowl with tomatoes; toss gently and serve.

Step-by-Step: Avoiding Waterlogged Cherry Tomato Salad

1. Spin Spinning the quartered tomatoes in a salad spinner removes excess liquid that can make salad watery. 2. Reduce Simmering the strained tomato liquid creates a concentrated tomato base for the vinaigrette.

Friday, November 6, 2009

My Meatloaf

This recipe is derived from the American's Test Kitchen (ATK) meatloaf recipes. One is for an all beef meatloaf (season 7) and the other is a bacon-wrapped meatloaf (season 1) that uses veal and pork. But my Safeway doesn't carry ground veal or meatloaf meat. So I combined the two substituting turkey for veal plus using the gelatin to keep my loaf moist.

Traditional meatloaf may also include lamb, rice, scrapple, etc. and is baked in a loaf pan and served with tomato ketchup. ATK developed their bacon-wrapped recipe to reduce the grease and produce a tasty dish that was not dried out or rubbery.

Bacon-Wrapped Meatloaf with Red Sweet Glaze

Servers 6 to 8.

Red Sweet Glaze (Double if you want sauce for serving.)

  • 1/4 cup chili sauce (substitute ketchup)
  • 2 T Light or dark brown sugar
  • 2 tsp Cider or white vinegar

Meatloaf

  • 2 ts Vegetable oil
  • 1 Onion, medium; chopped
  • 2 Garlic cloves; pressed
  • 2 Eggs, large
  • 1 tsp Dried thyme
  • 1 tsp Salt
  • 1/2 ts Ground fresh black pepper
  • 1 tsp Paprika
  • 2 tsp Dijon mustard
  • 2 tsp Worcestershire sauce
  • 1 tsp Hot red pepper sauce
  • 1/2 cup milk; low-fat plain yogurt
  • 2 lb Meat-loaf mix; (2 parts chuck, 1 part ground veal, 1 part ground pork) (substitute ground turkey for veal if you have no choice)
  • 24 Crushed saltine crackers
  • 1/3 cup Minced parsley
  • 6 oz Thin-sliced bacon
  • Sweet Red Glaze

Preparation

Mix all the Red Sweet Glaze ingredients in a small bowl; set aside.

Meat Loaf Preheat oven to 350 degrees.

Build a baking rack. Cookie sheet (or shallow roasting pan) lined with aluminum foil, wire rack sprayed with PAM, meatloaf tray made of 2 or 3 layers of aluminum foil about 5" by 9". Poke holds in the try to allow grease to drain. Spray tray with PAM.

Heat oil in a medium skillet. Add onion and garlic, saute until softened, about 5 minutes; set aside to cool.

Mix eggs with thyme, salt, pepper, mustard, Worchestershire, pepper sauce, and milk or yogurt. Add egg mixture to meat in a large bowl, along with crackers, oatmeal or bread crumbs, parsley and cook onions and garlic; mix with a fork until evenly blended and meat mixture does not stick to bowl. (If mixture does stick, add additional milk, a couple tablespoons at a time, and continue stirring until mixture stops sticking.)

Turn meat mixture onto the foil tray and form into a loaf. Smooth the sides of the loaf with a wet rubber spatula.

With wet hands, pat mixture into a loaf approximately 9 by 5 inches. Cover a wire rack with foil; prick foil in several places with a fork. Place a rack on a shallow roasting pan lined with foil for easy cleanup. Set formed loaf on rack.

Tuck ends under.

Brush loaf with the glaze. Then arrange bacon slices, crosswise, over loaf, overlapping them slightly. In order to prevent curling, allow the ends of the bacon to hang off the loaf then trim the excess bacon of so that you have about half an inch of the bacon to tuck under. Tuck the ends in under the meatloaf.

Ready to bake.

Bake loaf until bacon is crisp and loaf registers 160 degrees, about 1 hour.

Reduce the remaining sauce over medium low heat. The heat will sterilize the sauce that has become contaminated by contact with the raw meats.

Optional: Just before removing from the oven put some of the reduced sauce on the bacon and put it under the broiler to glaze.

Remove from oven/broiler. Rest for 20 minutes. Slice and serve.

Monday, September 21, 2009

Cuban Style Roast Pig

Sharon came back from music camp last winter with a hankering for a new pork dish that the cheif at Bishop's Ranch had prepared for diner on Saturday evening. She asked for the recipe and he referred her to this book on cooking pork, Bruce Aidells's Complete Book of Pork: A Guide to Buying, Storing, and Cooking the World's Favorite Meat. We read some yesterday and decided to make the lechon for Sharon's birthday meal on Saturday (or did I just want an excuse to cook this weekend?)

His essay on ham was quite informative and entertaining. Made me want to read the book chrome://foxytunes-public/content/signatures/signature-button.pngcover to cover and to explore his culinary world of pork. I have made a couple of pork recipes that I love, pulled pork and pepsi pork, so I expect to find more winners here.

Of course there is a more authentic/Cuban Lechon Asado recipe for suckling pig if you want to go whole hog. (-8 pun intended :-)


Roasted Pork Shoulder, Cuban Style (serves 8)

1 bone-in (or boneless) Boston butt (pork shoulder cut), 5 to 7 pounds

For marinating and cooking:

1/4 cup triple sec or Grand Marnier
1/2 cup freshly squeezed lime juice
1/2 cup freshly squeezed orange juice
2 tablespoons brown sugar
1 tablespoon whole cumin seeds
2 tablespoons chopped fresh or dried oregano
1 tablespoon grated lime zest
2 tablespoons minced garlic
1/2 cup soy sauce
2 teaspoons freshly ground black pepper
3 tablespoons olive oil

1) Make the Cuban Marinade by combining all ingredients, except pork, in bowl and mix well. Set aside/refrigerate 1/3 cup of the marinade for the Citrus Sauce.

2) Place pork in 2-gallon zip-lock plastic bag and pour in remaining marinade. Seal and refrigerate overnight or up to 2 days, turning bag occasionally to redistribute marinade.

3) When ready to roast, remove pork from marinade, shake off excess and discard marinade. Let meat sit at room temperature 1 hour.

4) Preheat oven to 325° F. Place roast in roasting pan and begin cooking. After 2 hours, begin checking roast for doneness. When meat is fork tender in several spots, remove from oven. Transfer pork to cutting board and tent with foil. Let rest 15 to 30 minutes.

5) While roast is cooking make the Citrus Mojo Sauce. Heat the olive oil in a saucepan and bloom the garlic and cumin for 30 seconds.

6) Pour most of the remaining ingredients except the cilantro and dissolved cornstarch into saucepan. Bring to boil, reduce heat to maintain a simmer and cook 5 minutes. Adjust acidity and sweetness to taste with additional lime juice and sugar.

7) Stir in dissolved cornstarch, bring to boil 30 seconds to thicken slightly then set aside.

Citrus Mojo Sauce (for serving):

3 cloves crushed garlic
1 tsp cumin powder
1 T olive oil
1/3 cup reserved marinade
3/4 cup freshly squeezed orange juice
1/4 cup freshly squeezed lime juice, or to taste
1 teaspoon sugar, or to taste (omit if you used sweet oranges)
1/2 cup chopped cilantro (optional)
2 teaspoons cornstarch dissolved in 2 tablespoons water

8) Right before serving pork rewarm the Citrus Sauce and add in the cilantro.

9) Carve pork into 1/4-inch-thick slices, arrange on a platter, drizzle with a little sauce and serve remaining sauce in gravy boat at the table.


Note 1: Alternatively you can grill the pork on a BBQ with indirect heat at about 300° to 325° F oven instead of using a oven. Use a drip pan under the grill to catch the fat and juices. The cooking time and range for doneness are roughly the same. Use some hickory wood for that outdoorsy flavor.

Note 2: For bigger parties use a whole pork shoulder (butt and picnic as one big hunk of meat). Just double the marinade and sauce recipes. Grill/roast the shoulder for 3 to 4 hours. Serves 12 to 16 folks.

Jaya's Citrus Mojo Sauce:

Before serving add 1 to 2 parts Joe Caribe' Caribbean To-go's Habanero sauce to 6 parts Citrus Mojo Sauce. Nice heat but not recommended for most people.


Nude Descending Staircase No. 2 Aside: This painting is what I first thought of when Sharon started talking about the Cubist pork she had for dinner; Nude Descending a Staircase (No. 2) by Marcel Duchamp, 1912.


Pulp Fiction (1994)

Vincent: Want some bacon?
Jules: No, man. I don't eat pork.
Vincent: Are you Jewish?
Jules: Nah, I ain't Jewish, I just don't dig on swine, that's all.
Vincent: Why not?
Jules: Pigs are filthy animals. I don't eat filthy animals.
Vincent: Yeah, but bacon tastes good. Pork chops taste good.
Jules: Hey, sewer rat may taste like pumpkin pie, but I'd never know 'cause I wouldn't eat the filthy motherfucker. Pigs sleep and root in shit. That's a filthy animal. I ain't eatin' nothing that ain't got sense enough to disregard its own feces.
Vincent: How about a dog? Dog eats its own feces.
Jules: I don't eat dog either.
Vincent: Yeah, but do you consider a dog to be a filthy animal?
Jules: I wouldn't go so far as to call a dog filthy, but they're definitely dirty. A dog's got personality. Personality goes a long way.
Vincent: Ah, so by that rationale, if a pig had a better personality, he would cease to be a filthy animal. Is that true?
Jules: Well, we'd have to be talkin' about one charming motherfucking pig. I mean, he'd have to be ten times more charming than that Arnold on Green Acres, you know what I'm saying?
Vincent: [laughing] That's good.

Chicken Fried Steak

We got this recipe from American's Test Kitchen Season 4, the Truck Stop Favorites episode.

The Coconut Cream Pie was good but since I don't particularly get excited over non-chocolate deserts we haven't made it a second time. The chick fried steak on the other hand has become my favorite meal. Sharon makes it for me on my birthday every year.

Makes a real mess of the kitchen with the batter and hot oil. We use the dutch oven for frying. Since you have the oil going might as well bread up a few vegetables and deep fry them while your at it. Takes about two and a half hours to prepare.

Sunday, September 20, 2009

LoughHaven Restaurant

LoughHaven Restaurant is going to reopen. Several years ago Sharon and I were inspired by Robert Rodriguez's supplemental material on the Once Upon A Time In Mexico (2003) DVD. He said that everyone should have a hand full of great recipes that they can put together at the drop of a hat. Then when people come over you have several thing that are fantastic that you can serve.

There is a new keyword, menu, used in this blog to identify the recipes on the LoughHaven dinner menu. When you are coming over tell us what you would like and we'll make it for you. Goood!

We only include dishes that we thoroughly enjoy and know how to prepare.

There are a few other things that are on the menu but have not been recorded here yet. Check back for the grilled salmon with spice rub asperigous and maybe even upma/uppammaa/upama (a spicy Indian dish using curry, vegetables and Cream of Wheat).

Sunday, April 12, 2009

Tomato Sauce, Quicker

This is a new variation of my home made fresh tomato sauce. It doesn't make as many dirty dishes and is a wee bit faster. The recipe is from ATK. It makes a cup of sauce, enough for one pound of pasta.

Ingredients

2tablespoons unsalted butter
1/4cup grated onion
1/4teaspoon dried oregano
2medium cloves garlic, minced or pressed through garlic press (about 2 teaspoons)
1can (28 ounces) crushed tomatoes, Tuttorosso or Muir Glen
1/4teaspoon sugar
1/4teaspoon red pepper flakes
1tablespoons extra-virgin olive oil
2 tablespoons fresh basil leaves, coarsely chopped
table salt and ground black pepper to taste

Preparation

  1. Melt the butter in a large heavy-bottomed saucepan over medium-high heat.
  2. Add the graded onion, oregano, 1/2 teaspoon salt, and red pepper flakes; cook, stirring occasionally, until the liquid has evaporated and the onion is golden brown, about 5 minutes.
  3. Add garlic and cook until fragrant, about 30 seconds.
  4. Stir in the tomatoes and sugar.
  5. Increase heat to high and bring the sauce to a simmer, then reduce heat to medium-low and simmer, stirring occasionally, until slightly thickened and reduced, about 10 minutes.
  6. Off heat stir in basil and olive oil; season to taste with salt and fresh ground black pepper.

Monday, April 6, 2009

Garlic Rosemary Chicken Brine

I brine all my grilled chicken for up to an hour before cooking. Before the brining process I trim the loose skin and all the fat with my kitchen scissors. Often, I air dry the chicken in the refrigerator for a while so that the skin is more crispy. Here is a new idea from ATK that I tested this weekend.
1/2 cup table salt
10 cloves garlic , unpeeled
3 sprigs fresh rosemary
2 quarts water

Combine salt, garlic, and rosemary in zipper-lock bag; seal, pressing out air. Pound with meat pounder or rolling pin until garlic cloves are crushed. Transfer mixture to large container or stockpot and stir in 2 cups hot tap water; let stand 10 minutes to release flavors. Add 1 1/2 quarts cold tap water and stir until salt is dissolved. Submerge chicken in brine and refrigerate 1 hour.

Remove chicken from brine and pat dry with paper towels.

Tuesday, February 17, 2009

Baked Ziti

We made baked ziti for our special meal on Valentine's Day this year. I used the recipe in the current Cook's Illustrated magazine (March/April 2009, pages 14-15). This article talks about common problems the Test Kitchen was attempting to solve.

I suggested to Sharon that we add some crushed red pepper flakes, she vetoed it. Later Sharon went online to look up baked ziti sopranos and found out that Carmela Soprano's recipe was published. Turns out her secret for great baked ziti is the addition of crushed red peppers. Next time :)

Tasted great, rich without being heavy. Served with garlic bread and squash. Even better on subsequent days (like my chili, in this case I don't consider it left-overs).

Next time we want to try using "store bought" sauces so we can prepare it in a hour instead of three. But I suspect that the homemade tomato sauce is very important to the final fresh/light experience. It might help if we get everything ready before cooking the pasta so that the dish can be assembled "wet" to minimize the unclumping job.

Sunday, June 1, 2008

Grilled Sausages with Onions

Cook's Illustrated picture This month's issue of Cook's Illustrated (No. 93) has a couple of articles on grilling. Since Sharon came home with 2.5 pounds, 11 links, of New York pork jalapeño sausage yesterday I decided to make the Gas-Grilled Sausages with Peppers and Onions this weekend.

Chicken Thighs Grilled chicken thighs To warm the grill up first I cooked up a batch of chicken thighs. Brine the chicken in a hand full of Morton's Kosher salt and half gallon of water, in the refrigerator for at least 30 minutes. Rinse with tap water and trim the fat and loose skin. This reduces the flare ups and charred bits. Dry the chicken. Put on a low sodium rub if you like or just use cayenne and fresh black pepper (the salt is already in the chicken). On a hot grill cook skin side down until there are good grill marks, 2 minutes. Turn over and repeat. Reduce heat to medium and cook each side 5 to 8 minutes until done. One of the articles suggested covering the chicken with loose aluminum foil to cook until almost done after the initial searing. The finish on high heat 2 minutes per side adding BBQ sauce or glaze if you like that sort of thing.

Sausages and Onions Ready for the grill Start the onions in the microwave to get them partially cooked. In addition to the salt, black pepper and thyme I added a cap of hickory smoke. Put somewhat softened onions in a grill pan, cover with the raw sausage and quartered red bell peppers (we forgot the peppers today). Seal the disposable aluminum pan with aluminum foil and place on the grill, medium high, for 15 minutes (sausages turned pale when they cooked).Grilled sausages and caramelized onions

Grilled/browned the sausages and pepper with the pan pushed off to one side (still cooking the onions in their own juice and the rendered sausage fat). When the sausage is browned remove them and finish grilling the peppers. Cover the grill again and continue cooking the onions with an occasional stir until the liquid evaporates and the onions begin to brown, 5 to 10 additional minutes. It took me 35 minutes total on the grill.Dean checking the recipt

Monday, December 24, 2007

Turkey Gravy, 4 hour version

Make Ahead Turkey Gravy

My biggest problem with traditional gravy recipes is that they are last-minute. This is the final kitchen task of the day, since you need the drippings from the turkey roasting pan and stock from simmering giblets for the best flavor. For best results, try to get others to help with finishing other dishes while you concentrate on that gravy. I've never even attempted to pull this off but instead settle for something quicker and get down to the eating.

There are some secrets to making perfect gravy.

  • Use a wire whisk to stir the gravy to avoid lumps.
  • Make sure to thoroughly cook the flour in the fat (before adding liquid) to avoid a starchy taste.
  • Salt is the key to the best flavor.

This recipe is adapted from Cook's Illustrated magazine, November/December 2001 edition. ATK recipe for Make Ahead Turkey Gravy.

Prep Time: 10 minutes Cook Time: about 3 hours Yield: approximately 1 quart

Turkey giblets (discard the liver, as it will make the stock cloudy and taste metallic) and neck plus the ribs, back bone, loose skin and fat (see butterflied turkey recipe) from the turkey. 1 medium carrot, coarsely chopped into 1-inch pieces 1 celery rib, coarsely chopped into 1-inch pieces 2 small onions, coarsely chopped into 1-inch pieces 6 garlic cloves, unpeeled

3 1/2 cups low-sodium chicken broth 3 cups water 2 cups dry white wine 6 sprigs fresh thyme 1/4 cup all-purpose flour

Heat the oven to 450°. Place turkey giblets, necks, backs, carrot, celery, onions, and garlic into a large flameproof roasting pan. Spray lightly with nonstick cooking spray and toss to combine. Roast, stirring every 10 minutes, until golden-browned, about 45 minutes.

Remove roasting pan from oven and dump the solids into a large saucepan or stock pot. Place the roasting pan over 1 or 2 burners set at high heat. Add some of the chicken stock and deglaze the pan, scraping up browned bits on the bottom of the pan with a wooden spoon.

Transfer contents of the roasting pan to the saucepan. Add wine, 2 cups of water, and thyme sprigs; bring to a boil over high heat. Reduce heat to low and simmer until reduced by half, about 1 1/2 hours. Strain stock into a large measuring cup or container. Cool to room temperature, then cover with plastic wrap and refrigerate until fat congeals, about 1 hour.

Skim fat from the stock and reserve/save. Pour the stock through a fine-mesh strainer to remove remaining bits of fat; discard bits in strainer. Bring stock to a simmer in a medium saucepan over medium-high heat. In a second medium saucepan, heat 4 Tbsp of the reserved turkey fat over medium-high heat until bubbling (if you don't have 4 Tbsp of fat, make up the difference with butter). Whisk in the flour and cook, whisking constantly, until combined and toasty honey-colored, about 2 minutes. Continuing to whisk constantly, gradually add the hot stock; bring to a boil, then reduce heat to medium-low and simmer, stirring occasionally, until slightly thickened, about 5 minutes. Cool to room temperature, then cover and refrigerate for up to 3 days.

To serve: bring the gravy to a simmer in a medium saucepan. Add a few grinds of black pepper, and then stir well to combine. Taste the gravy carefully. Adjust seasonings with more salt and pepper if necessary.

Salt is the key to the best gravy. But you have to add and taste constantly. Start with about 1/2 tsp. for 4 cups of liquid. Then sprinkle in a tiny bit at a time, stirring and tasting. You'll know when you have the right amount, because the gravy will suddenly come alive with a marvelous meaty flavor.

Transfer the gravy to a boat and serve.