Sunday, September 19, 2010

Greek Shrimp with Feta

This easy weeknight Greek dish defies the old saw that seafood and cheese don't work together—if, that is, you get every element just right. From the Cooks Illustrated magazine for September & October 2010.
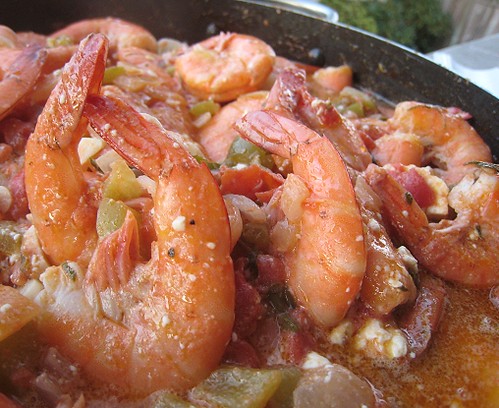
I made this recipe when I first got this month's Cooks Illustrated magazine and we really really liked it. They wanted to simplify and improve on the classic Greek dish, shrimp saganaki. Since I didn't have ouzo I did the vodka anise substitute and it worked (remember, I do NOT like licorice so I was pleasantly surprised that it complimented the dish and didn't ruin it.) I didn't know we had fresh parsley & dill in the garden so I substituted fresh basil. ATK recommends feta made with sheep or goat milk but Safeway only had American cows milk varieties.

The next week I made it but skipped the ouzo marinade and used Paul Newman's Own pasta sauce for a quick low hassle version. It was good food but not the spectacular complex flavor of the Cooks Illustrated recipe. What follows it mostly from the magazine, page 13.

Greek-Style Shrimp with Tomatoes and Feta Serves 6 with crusty bread, steamed white rice or my favorite egg noodles.

301 calories per serving of shrimp, 221 calories per cup of egg noodles.

  • 1 1/2 pounds shrimp (thawed, peeled and deveined)
  • 4 tablespoon extra-virgin olive oil
  • 3 tablespoons ouzo
  • 5 medium garlic cloves (minces or pressed, about 5 teaspoons)
  • 1 teaspoon grated zest from 1 lemon
  • Table salt and fresh ground black pepper
  • 1 small onion, diced medium (about 1/2 cup)
  • 1/2 medium green bell pepper, stemmed, seeded and diced medium (about 1/2 cup)
  • 1/2 medium red bell pepper, stemmed, seeded and diced medium (about 1/2 cup)
  • 1/2 teaspoon red pepper flakes
  • 28 oz Hunt's diced tomatoes drained, 1/3 cup juices reserved
  • 1/4 cup dry white wine
  • 2 tablespoons coarsely chopped fresh parsley leaves
  • 6 ounces feta cheese, crumbled (about 1 1/2 cups)
  • 2 tablespoons chopped fresh dill
  1. Toss shrimp, 1 tablespoon oil, tablespoon ouzo, 1 teaspoon garlic, lemon zest, 1/4 teaspoon salt, and 1/8 teaspoon black pepper in a small bowl until well combined. Set aside while preparing sauce.
  2. Heat 2 tablespoons oil in 12-inch skillet over medium heat until shimmering. Add onion, red and green bell pepper, and 1/4 teaspoon salt and stir to combine. Cover skillet and cook, stirring occasionally, until vegetables release their moisture, 3 to 5 minutes. Uncover and continue to cook, stirring occasionally, until moisture cooks off and vegetables have softened, about 5 minutes longer.
  3. Add remaining 4 teaspoons garlic and red pepper flakes and cook until fragrant, about 1 minute. Add tomatoes and reserved juice, wine and remaining 2 tablespoons ouzo, increase heat to medium-high and bring to simmer.
  4. Reduce heat to medium and simmer, stirring occasionally, until flavors have melded and sauce is slightly thickened (sauce should not be completely dry), 5 to 8 minutes.
  5. Stir in parsley and season to taste with salt and black pepper.
  6. Reduce heat to medium-low and add shrimp along with any accumulated liquid to pan; stir to coat and distribute evenly. [Also branch to step 8, start cooking pasta.] Cover and cook, stirring occasionally, until shrimp are opaque throughout, 6 to 9 minutes for extra-large shrimp (21 to 25 count) or 7 to 11 minutes for jumbo (16 to 20 count), adjusting heat as needed to maintain bare simmer.
  7. Remove pan from heat and sprinkle evenly with feta. Drizzle remaining tablespoon oil evenly over top and sprinkle with dill.
  8. Serve immediately over extra wide egg noodles made with Durum wheat, 12 oz package. Dump the pasta into the boiling salt water about the time the shrimp are added to the dish (step 6).

Here is a video I found in researching this recipe. I learned a few things (you can light the ouzo on fire the way he does it.) But I think the Cooks Illustrated recipe looks better.

Saturday, August 28, 2010

Learning PowerShell

My professional goal for 2010 is to start using PowerShell. The developers back in Chicago use it for everything and it seems to be the new scripting language of choice for the Window world. (Pash is a cross platform open source version was started but no news for a couple of years.)

Lots of resources on the net; blogs, script repositories, books, podcasts and such.

I have been reading a tutorial designed for people who don't know object oriented programming. As my scripting skills were developed a century ago. There hasn't been an opportunity to think OOP since the LISP days at IntelliGenetics. This introduction with explanation of OOP terminology/thought is very helpful. I imagine it would be a bit slow for someone versed in .NET or C++. Check it out on the Microsoft site, Sesame Script.

I am using the book Microsoft Windows PowerShell 2.0 Programming for the Absolute Beginner by Jerry Lee Ford to great effect. Reading it cover to cover and doing the example assignments. After completing chapter 3 I felt that I could re-write any script I've created in csh|sh|ksh into PowerShell. So no problem going forward building scripts at work (check off one 2010 job goal;).

Friday, August 27, 2010

Penetration Testing

I am listening to a class from East Tennessee Status University (ETSU) taught by David Frazier, Ethical Hacking CSCI 4957 (iTunes U). This wiki page defines to term Penetration Testing, an active analysis of a system's security primarily by utilizing common ways of compromising the system.

One of these days I would like to go through the class exercises and homework myself. A lot of tools and resources are discussed. I liked the concept of "competative grading", the person who has the best/biggest/most of the assignment gets the top grade and all other get a percentage of that top score.

In the mean time, I vow to improve my personal security by maturing my use of passwords. After learning more I'll investigate the tools. (Can't do it from work because Big Brother doesn't allow access to "potentially malicious" sites, good job IT.)

Read this article, Digital Wallets and Whistle Blowing. What do you think. Good problem for an ethics discussion.

Here is a launching point; Software Engineering Ethics Research Institute.

Good list of penetration test ideas on the SANS site: CWE/SANS Top 25 Most Dangerous Software Errors.

Google Hacking Database

Tuesday, August 24, 2010

Hip, 8 months

Going contra dancing again this weekend. Two weeks ago I dance for 90 minute over a 3 hour period with NO side effects; no pain, no stress on hips, fair workout and good time.

The fact that I have had an artificial hip installed is primarily an intellectual exercise now. By that I mean that my body doesn't seem to notice any more.

Friday, July 30, 2010

Pulled Pork Informaiton

I've been making pulled pork since fall of 2007. Trevor turned me on to it as a home BBQ staple. Here is some information from the July 2010 West Texas Bar-B-Que email newsletter (article re-posted below). We enjoy the West Texas food and I believe the BBQ tips are sound.


Ask Mr. BBQ

Question: I'm a beginning smoker. What would be my easiest cut of meat to start with? -John K. , Sacramento

Answer: Hey John! Pulled pork is a great way to start smoke cooking. It's one the tastiest too!

You'll want to use a Boston butt (aka: pork butt, butt, shoulder butt, shoulder roast). Even thought it's called a butt, it actually comes from the front of the hog. I read on the internet that it's called a butt because, after it's trimmed, the butt is barrel shaped, and barrels were often called butts by English wine merchants. I'm sure there are many other stories or thoughts on that.

Anyway, butts come in a lot of different sizes, but you should start with about a 5 pounder. They typically have shoulder blade bones in them although you can find "boneless butts" in some stores. Just go with the bone-in as it seems to add more flavor to the butt.

Pulled Pork Recipe

Cooking time. Allow 7 to 12 hours or 1.5 to 2 hours per pound at 225°F.

Ingredients:

  • 1 pork butt, about 5 pounds (this will get you about 3 ½ pounds of meat when done)
  • 1/4 cup vegetable oil
  • 1/2 cup Texas West BBQ Rub
  • 2 cups wood for smoke (enough to keep your temp steady)
  • 10 buns
  • Lot's of Texas West BBQ barbecue sauce (original or Secret Spicy)
  • Beer (for drinking while your smoking your pork butt)
Directions:

Trim some of the fat from the exterior of the meat but not all of it. Trim just enough to where you've got rub on meat and fat. If you're butt came tied with string to keep it together, be sure to leave it on there, you'll take it off when it's done.

Rinse and pat dry the butt then rub it with Oil. This helps the rub adhere to the meat. Cover your butt generously with Texas West BBQ rub and then let it sit in the fridge overnight.

Set up your cooker for indirect heat cooking and fire it up the cooker to about 225°F. Put the meat right on the grill grate, not in a pan, add 1/2 cup of wood chips to the coals or into your smoker box if you're using one. Get a comfortable lounge chair and relax with a good beer while you listen to the ball game. Check the cooker every hour or so to make sure you're holding at around 225°F. Keep adding wood chips, 1/4 cup at a time, every 30 minutes for the first two hours to keep the temp right. No need to mop the meat, it's not necessary for the pork butt and can cause havoc when trying to keep your temperature steady.

Allow about 1.5 to 2 hours per pound. Be patient. Use a meat thermometer and test it when you're about 7 hours in for a 5 pound butt. When the meat gets to 190°F, it's time to check it for doneness. The exterior will be quite dark brown or black, that's called the crust and it's really good! Don't worry, it's not burnt. If there is a bone, use a glove or paper towel to protect your fingers and wiggle the bone. If the bone turns easily and comes right out of the meat, you are done. If the internal temp hits 190°F but the meat is still not tender, reduce the heat in your cooker to about 180 or 190°F and check it in another 30 minutes.

After you take it off the cooker, let it rest for about 30 minutes then get to pullin'! It will go a lot faster if you get some help with this part! That's it! Pile it on a bun and top with some Texas West BBQ sauce. Enjoy!

Thursday, July 15, 2010

Hip, 6 months

I passed the six month mark with the new right hip and still not kicking. Start kicking on Saturday with the first Karate workout since surgery. The Doctor said wait six months before getting back on the mat and I am following his advise. Honestly at 3 months I felt like I could start working out again but now that I see what 6 months of healing is like I agree that half a year is sound advise.

Really looking forward to getting on the mat again. For weeks I had been planning on starting the first Saturday after the 6 month mark. But I learned from Kyoshi Ron Joslin at the 4th of July Auburn Fairgrounds that the dojo would be closed for the annual K.I.A.I. Grand National. I start this weekend; new hip, new dojo facilities.

On the six month anniversary I execised for 3 1/2 hours, until I started limping from the OA in the left/organic hip. Right hip not an issue at all :)